バージョン情報
Arduino IDE 1.0.6 ,windows 8.1 ,processing 2.2.1, enchantMOON 3.0.1
流行りのIoT (Internet of Things)用に、Raspberry pi + Node.jsに挑戦中なのだが、ちょっと寄り道して、windows上でもっと手軽にwebサーバ構築ができないのだろうかと思って調べてみたら、”めっちゃあるじゃん”。
ということで、お手軽そうなprocessingから挑戦。
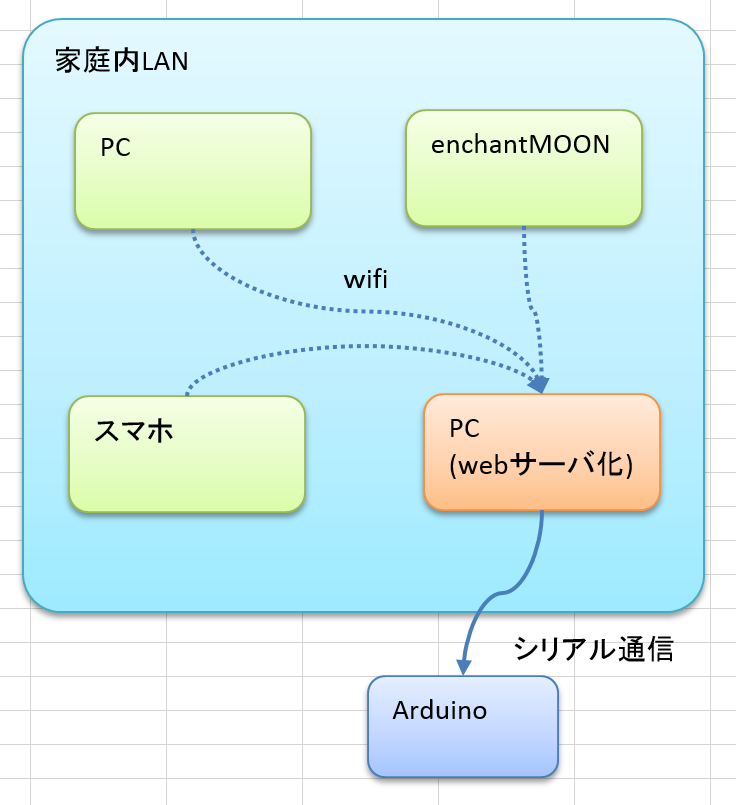
そして、今回はIoTの入口としてenchantMOONはどうなのか、試してみた。enchantMOONの手書きコマンドで、ArduinoにつないだRCサーボモータを動かしてみた。
完成イメージはこんな感じ。
webサーバ
processing.netライブラリを使用するとお手軽にwebサーバを立ち上げられる。
今回はhttpRequestのGETを使ってコマンドの送受信をしてみる。
以下の設定と仮定すると、”stop”というコマンドを送るには次のURLにアクセスする。
http://192.168.11.100:3333/stop
例)
ローカルIPアドレス:192.168.11.100
ポート:3333
コマンド:stop
import processing.net.*;
import processing.serial.*;

Server myServer;
Serial com;
String cmd;

void setup(){
  size(300,300);
  myServer = new Server(this, 3333);
  com = new Serial(this, "COM3", 38400);
}

void draw(){

  Client client = myServer.available();

  if(client!=null){

    println("Client IP Adress :"+client.ip());

    if(client.available()>0){
      String clientData = client.readString();
      println(clientData);

      String[] httpRequest = trim(split(clientData,'\n'));
      cmd =split(httpRequest[0]," ")[1];  //GETのパラメータ取得
      cmd = cmd.substring(1);             //先頭の/を除去

      if(!(cmd.equals("favicon.ico"))){
        //html head
        client.write("HTTP/1.1 200 OK\n");
        client.write("Content-Type: text/html\n");
        client.write("\n");
        //html body
        client.write("Action: " + cmd + "<br>");

        //Arduinoへ送信
        com.write(cmd);
        println(cmd);
      }
      client.stop();
    }
  }
}
Arduino サーボ
前に作った“Arduino スレーブその2:サーボ”を流用
enchantMOON

httpRequestを送るために、3個のjavascript実行ブロックを追加。
var xhr = new XMLHttpRequest();
xhr.open("GET" , "http://192.168.11.100:3333/stop",false);
xhr.send(null);
あとはenchantコマンドでシールを登録すれば準備完了。
動作確認
手書きコマンドでArduinoを操るのは想像以上に楽しいぞ。
こちらの記事もどうぞ
 2015年6月12日 Arduino + 色センサー + Processing シリアル通信
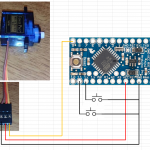 2015年1月24日 Arduino スレーブその2:サーボ
 2014年9月7日 processingで画像ファイルの画素情報を取得
 2014年9月28日 processing で3Dお絵かき
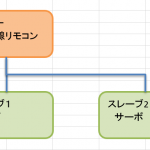 2015年2月6日 3台のArduinoをI2Cで通信してみた